When you download Windows OS from Microsoft Store or any online source, you get an operating system’s image as an ISO file.
An ISO file combines all the Windows installation files into a single uncompressed file – like a DVD clone or backup. By using this file, you can create a bootable USB drive which contains Windows installation files.
This tutorial will help you install Windows from .iso image file via bootable USB drive. It is a 3-step process explained with screenshots. All you need is at least 4 GB flash drive for Win 7 and 8 GB USB for Windows 8 or 10.
This is a 100% working tutorial. It covers these topics:
- How to Create Windows 7 Bootable USB Drive
- How to Install Windows 7 from ISO File
- Windows 7 USB Installation Guide
- Install Windows 7 on USB
It’s An Original Windows 7 USB Installation Guide
To create Windows 7 USB install disk, you need 3 things:
(1) Windows ISO image file. (2) ISO to USB burner software. (3) USB flash drive 8 GB.
Let’s Create Windows 7 Bootable USB Drive From ISO File
If you don’t already have Windows 7 ISO, then get it from Windows 7 ISO download page. The most popular edition is Windows 7 Ultimate. Choose 32-bit or 64-bit version when downloading the image file.
Then download Windows 7 USB/DVD tool. This is Microsoft’s genuine tool to burn ISO to a DVD or USB drive. To install the tool, you must be an administrator on the computer on which you are installing the tool.
Note: For 32-bit Windows OS Users
Users who are running 32-bit Windows need “bootsect” file to burn a 64-bit ISO file on USB drive successfully. bootsect.exe must be present in the same folder as the .iso file. You can download the file below.
[downloadlay id=”127″]
After you have installed the Windows 7 USB tool. Let’s make a USB copy of your Windows ISO file, using this tool.
Alternative: You can also create bootable USB with Rufus.
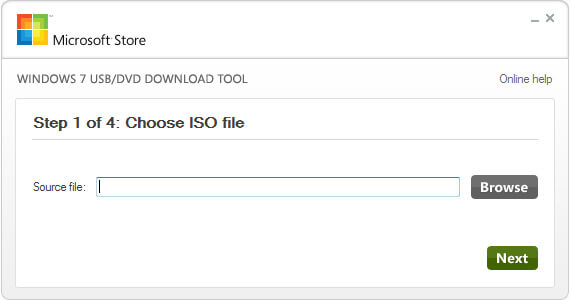
Step 1: Open Windows USB Tool & Choose ISO File
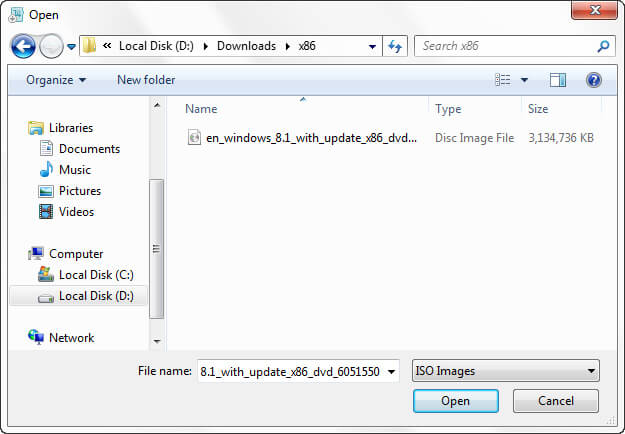
Open this tool from your programs. e.g. Start > All Programs. Click on Browse button and go to the path where your Windows ISO file is located. Select Windows 7 ISO file and click Open.
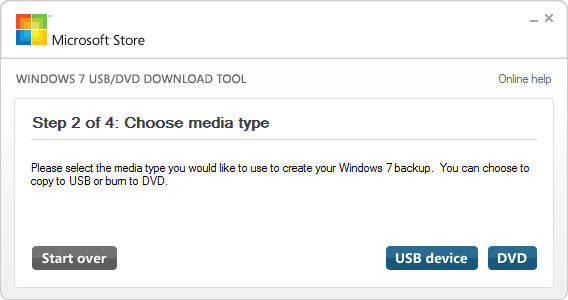
Step 2: Choose USB Media Type
Click on USB Device as media type you would like to use to create Windows 7 bootable USB drive.
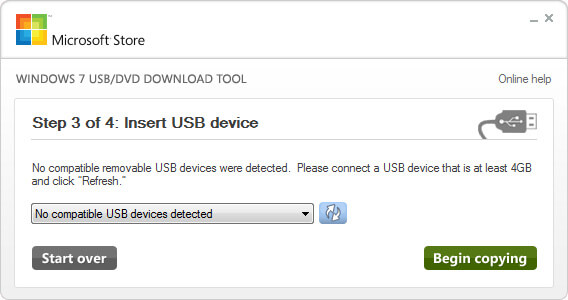
Step 3: Insert & Select Your USB Drive
From the Drop-Down box, select your USB Pen drive letter, e.g., H: or I: or G: and then click Begin copying. After the process is completed, the USB is now bootable. Turn off your computer and plug in USB. Now Turn on PC and boot from USB. Done.
Step 4: Bootable USB Device Created Successfully
When your Windows ISO file is copied, install Windows by moving to the root folder of your USB drive, and then double-click Setup.exe.
Your Windows Bootable USB Drive is Ready
With the bootable Windows USB, you will be able to install new Windows OS onto your PC.
If you change the boot order of drives in your PC’s BIOS, you can run the Windows installation directly from your USB drive when you first turn on your computer. You can search online for information about how to change the boot order of drives for your PC BIOS.
