Facing the dreaded “HP Printer Not Printing” problem can be a major productivity roadblock for both home and office users. It’s a frustrating situation where you’re left staring at your unresponsive printer, wondering why your important documents remain trapped in digital form.
This printer not printing problem arises due to several factors, including, Connectivity glitches, outdated drivers, paper jams, low ink levels, or settings errors that can all render your printer unresponsive.
However, in this article, we have come up with all the effective & working solutions that can easily resolve your not printing problem. So, let’s take a look.
Why Is My HP Printer Not Printing
“Why won’t my HP printer print?” This question may cross your mind when you’re facing the frustrating issue of your HP printer not working. After some research, it becomes clear that various factors could be responsible for these printing problems.
When you encounter one of the following cases, your HP printer won’t print.
- The printer driver is missing or outdated.
- You get a faulty connection.
- You set a bad configuration in Windows.
- There’s something wrong with the printer.
How To Fix HP Printer Not Printing Issue
If your HP printer not printing the desired thing you want then you have to do the below quick fixes;
- Check the Status of Your HP Printer.
- Check Your Printer’s Error Lights.
- Ensure You Have the Right Printer.
- Cancel all print jobs.
- Fiddle With the Ink Cartridges.
In case the problem still exists, then you can try the below potential fixes to resolve your HP printer not printing problem;
1. Clear the Printer Queue
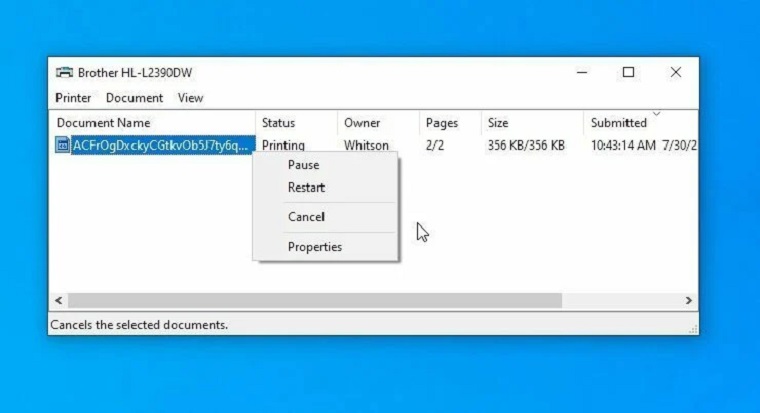
Sometimes, your computer’s print queue can get jammed up with old documents that failed to print for one reason or another, holding up the document you need right now. To do so, just follow the below steps;
On Windows PC:
- Right-click on the printer icon in the Windows notification area.
- Choose Open All Printers to see a list of currently queued items.
- Otherwise, Head to Settings > Devices > Printers & scanners.
- Click your printer in the list and choose Open Queue.
On Mac:
- Click the Print Center icon that appears in the Dock during the printing process.
- You can also go to System Settings > Printers & Scanners, and choose your printer.
- Click the Printer Queue button.
You can then manage the queue if you right-click any old items stuck on the list and clear them to get things chugging again.
2. Restart the Print Spooler
There are a few ways to do this, but the easiest is probably from the Command Prompt. To do so, just follow the below steps;
Step 1: Open the Start menu, search for “Command Prompt,” right-click the option that appears, and choose Run As Administrator.
Step 2: Paste in the following commands, pressing Enter after each one:
net stop spoolerdel %systemroot%\System32\spool\PRINTERS\* /Q /F /Snet start spooler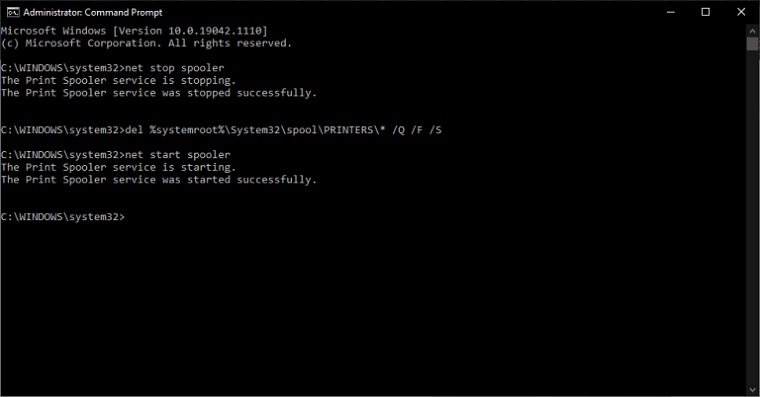
With any luck, this will bring your printer back to life and you’ll get the document you’ve been waiting for. With any luck, this will bring your printer back to life and you’ll get the document you’ve been waiting for.
3. Check the Connection
If you’re facing HP printer problems while trying to print over Wi-Fi, consider switching to a USB connection as a quick test. If printing via USB works smoothly, it suggests that the issue might be related to your Wi-Fi connection. In such cases, it’s worthwhile to direct your troubleshooting efforts toward resolving the Wi-Fi problem.
Ensure that your printer receives a strong and stable Wi-Fi signal. Check if the printer appears in your router’s network list or try relocating it closer to the router to eliminate signal issues. Sometimes, even small obstacles like closed doors can disrupt weak Wi-Fi signals, so keep that in mind for improved connectivity.
4. Check That the Paper Tray Is Full (Not Jammed)
Sometimes, even when your printer has paper, it can act a bit finicky. It might think it’s out of paper even when it’s not. To be safe, try adding more paper to the tray and make sure it’s aligned properly.
Another common issue is paper jams. If your printer says there’s a jam, open it up and gently remove the stuck paper. Your printer’s manual can guide you if you’re not sure where to look.
In more stubborn cases, your printer might claim there’s a jam even if you can’t see any paper. This could mean tiny bits of paper or other gunk are stuck inside the rollers. If you’re not comfortable taking it apart, it’s a good idea to get professional help from a PC repair shop.
5. Update or Reinstall the Printer Driver
In many cases, the printer won’t print issue comes from faulty drivers. You may need to update or reinstall the printer driver to fix your HP printer, not the printing issue.
To update the printer driver, you have to follow the below steps;
For Windows Laptop/Computer;
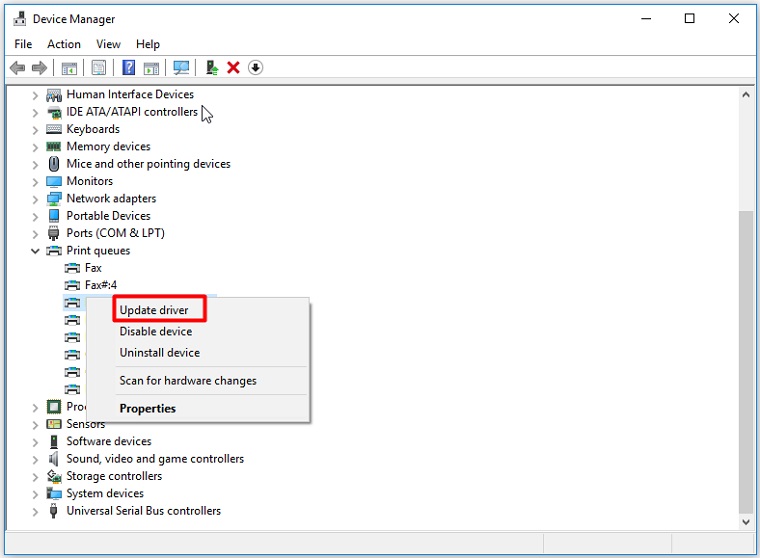
Step 1: Right-click the Windows icon and select Device Manager from the menu.
Step 2: Click the arrow next to Print Queues, then right-click on a print queue listed and select Update Driver.
Step 3: Select Search automatically for updated driver software.
Step 4: Click on Update Driver.
For Mac laptops Users;
Step 1: Open System Preferences > Accessibility, then click Print Queue in the menu on the left.
Step 2: Check whether Enable Slow Keys is selected in the Hardware section. If so, unselect Enable Slow Keys.
Alternatively, you can download Driver Easy and make the whole process seamless. Download the software and install it; upon launching, click on check for updates and let the software find the latest drivers for your hardware. Once the process is complete, install the drivers and restart your PC.
6. Set The Printer As Default
When you want to print something, your computer usually picks the default printer unless you tell it otherwise. So, if you haven’t set your HP printer as the default or chosen it as the printer to use, it won’t print your documents.
If you want to set your HP printer as default, please follow the steps below.
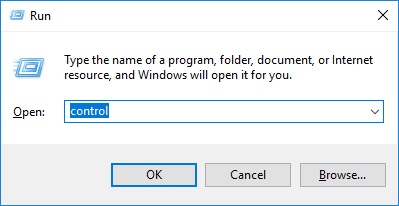
Step 1. Press the Window logo key and R key on your keyboard at the same time to open the Run dialog. In this dialog, type “control” and hit Enter. This will open the Control Panel.
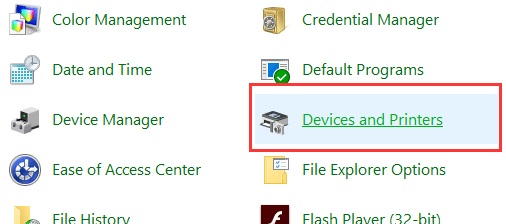
Step 2: In Control Panel select Devices and Printers.
Step 3: In the Printers section, right-click on your HP printer and then select Set as default printer. Click on Yes if prompted.
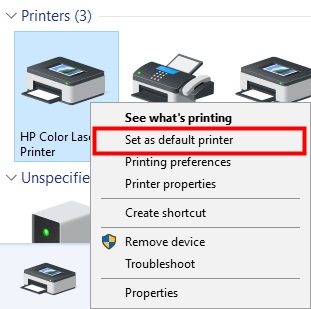
Step 4: There is now a tick below the icon of your HP printer. That means it is now set as the default printer.
FAQs – HP Printer Not Printing
1. Why Is My Printer Running but Not Printing?
Your HP printer may be running but not printing due to reasons like:
- Faulty drivers
- Faulty cable connection from the computer to the printer
- Jobs may be stuck in the print queue
- Paper jam is also a common issue that many people overlook.
- The printer may be out of paper
- The paper tray may not be closed properly.
2. How Do I Reset My HP Printer?
Depending on your HP printer model, accessing the reset settings may be straightforward compared to others. You can reset your HP printer using the factory reset setting or by doing it manually.
To reset your printer manually (this method works for most printer models):
- Turn off your printer.
- Disconnect the power cable from the printer and the wall.
- Wait for around 60 seconds and plug in the power cable back to the printer
- The printer will undergo a hard reset.
- Wait for the cartridges to align and center, then try printing a test page or document.
Most printers have the option to restore their settings to default, this is called factory resetting, and the option is usually in the “tools” section in most HP printer models.


![Intuit QuickBooks Payroll Review [year]: Features, Prices & How it Works](png/intuit-quickbooks-payroll-review-features-prices-how-it-works-1-300x212.png)


![Best VPN Service in [year]: VPNs tested by our Experts](png/best-vpn-service-vpns-tested-by-our-experts-softlay-300x169.png)
