Installing OptiFine can be quite difficult especially if you’re new to Minecraft modding. Don’t worry we’re going to break down everything into simple steps for you. This article will also provide a complete guide on how to download, install, and use shader packs with Optifine.
There are two ways to install OptiFine depending on whether you’re installing it in the vanilla Minecraft Java Edition or Minecraft Forge version. Users who aren’t running any other mods can install it directly into their vanilla Minecraft Java Edition (JE). However, if you’re running mods in Minecraft with Forge then the process of installing Optifine will be completely different for you.
You will also need Java (JRE) and Forge before you can install and use OptiFine in Minecraft. Only install Forge if you plan on modding your Minecraft later on. Make sure to install these prerequisites in the order provided below so you don’t encounter any problems/issues.
Prerequisite 1: Install Java (JRE)
Before installing Optifine, we will first need to download & install Java, as Minecraft and all of its mods are dependent on it. Follow the steps below to install Java Runtime Environment:
Step 1: Download the latest version of Java Runtime Environment (JRE) and run the installer.
Step 2: Choose the location where you want to install Java and click Install.
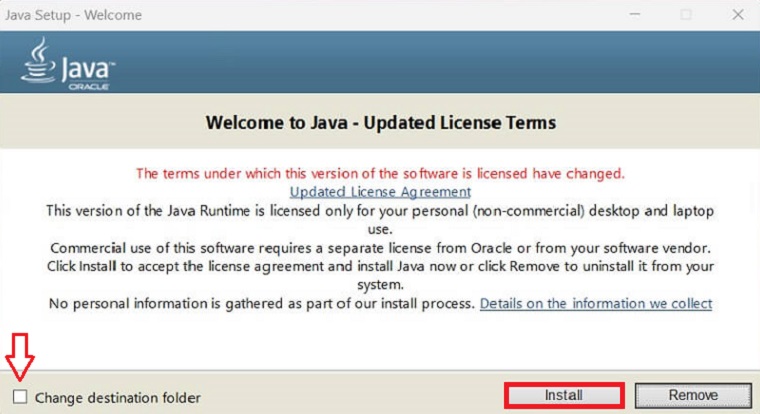
Step 3: Once installation is complete click on the Close button. Now Java is installed in your PC.
Prerequisite 2: Install Forge for Minecraft (Optional)
If you wish to use Optifine with the Forge version of Minecraft then this step is a must for you. Once the Java (JRE) installation is complete, you can proceed to install Forge Mod Loader for Minecraft. Follow the steps below to install Forge for Minecraft & Optifine:
Step 1: Download the latest version of Forge Mod Loader. It will download as a jar file.
Step 2: Double-click on the jar file to launch the Forge installer.
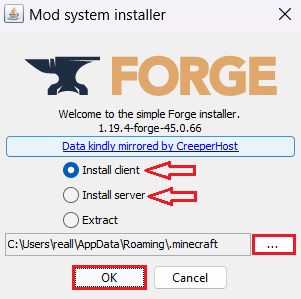
Step 3: Select Install Client (if installing for client-side) and click “OK” to install Forge.
Note: Don’t install Forge into a server as it does not support server installation. Select the Install Client option here.
How to Download OptiFine in Minecraft’s Latest Version
Visit our OptiFine’s Latest Version Webpage and follow the instructions below to download OptiFine or any of its previous available versions:
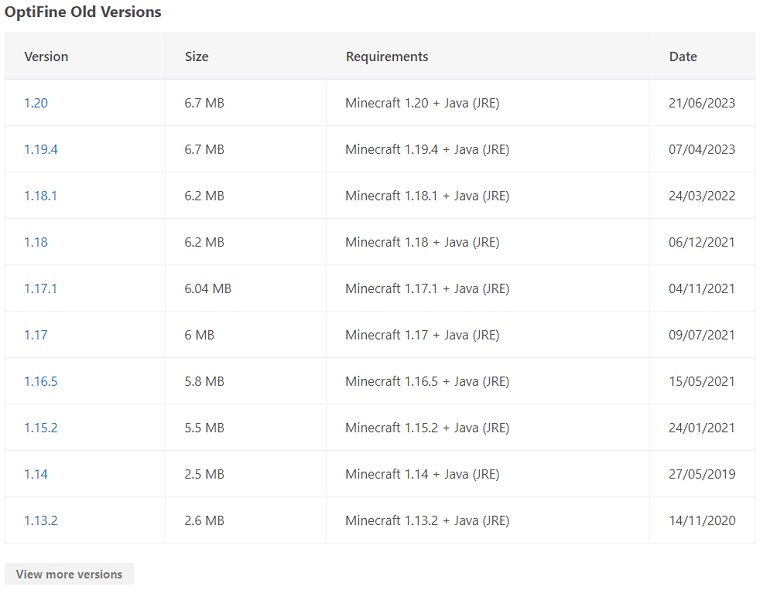
Step 1: Download the latest version of OptiFine or click on View More Versions at the bottom of the page to select your desired version.
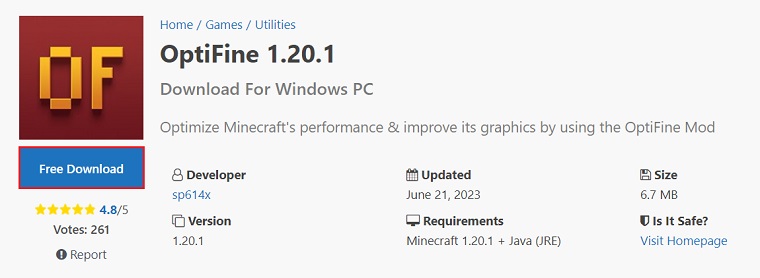
Step 2: Click on the “Free Download” button.
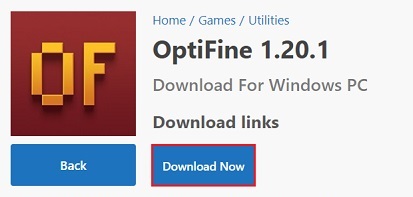
Step 3: Once the new page has launched click on the “Download Now” button.
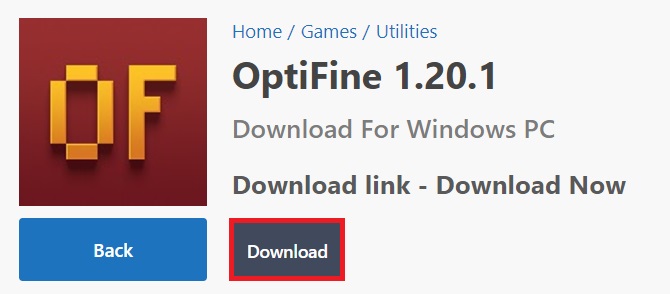
Step 4: In the newly opened page click on the “Download” button and OptiFine should start downloading.
How to Install OptiFine in Minecraft’s Latest Version
When the installation of both prerequisites is complete, and you have downloaded the version of Optifine you need. Proceed with the installation of Optifine.
Installing OptiFine in Minecraft Java Edition (JE)
If you want to install OptiFine into the vanilla Minecraft Java Edition then follow the steps below:
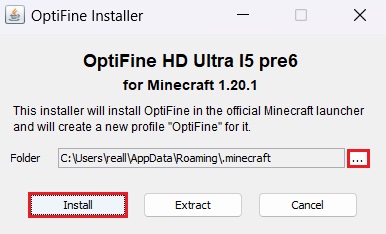
Step 1: Download your desired version of OptiFine and run the newly downloaded *.jar file of OptiFine.
Step 2: Click on Install to start the installation.
Installing OptiFine in Minecraft for MacOS
OptiFine is compatible with MacOS which means you can use it on your Apple devices like Macbook, iMac, etc in Minecraft Java Edition. The steps for using it are almost identical to the Windows version except for one. Follow the instructions below to get Optifine running on MacOS:
Step 1: Download the desired version of Optifine. Launch the downloaded jar file of Optifine.
Step 2: You will see a window saying “.jar file cannot be opened because it is from an unidentified developer”.
Step 3: Open System Settings, click on the Privacy & Security tab, and scroll all the way to the end.
Step 4: Under the Security section, click on Open Anyway below the “.jar was blocked from use because it is not from an identified developer”.
Step 5: Enter your password in the newly opened window and click Modify Settings.
Step 6: Now open OptiFine and click on Install to begin the installation.
Installing OptiFine in Minecraft Forge
For those who want to install OptiFine into the Forge version of Minecraft, you can follow the steps given below only if you have Forge already installed.
Step 1: Download your desired version of OptiFine from here.
Step 2: Move the downloaded *.jar file into the Mods folder inside Minecraft’s installation directory located in “Local Disk (C:) > Users > (Your PC Name) > AppData > Roaming > .minecraft > mods”.

Step 3: OptiFine is now installed in Minecraft Forge.
Installing OptiFine in Curseforge
OptiFine is compatible with Curseforge and in order to use it, Optifine will need to be added to a mod pack. Follow the steps below to add Optifine to a modpack of your choice:
Step 1: In the Curseforge launcher go to the My Modpacks tab and select the modpack you wish to add Optifine to.
Step 2: Click on the three dots next to the Play button and from the drop-down menu click on Open Folder.
Step 3: Place the supported version of the Optifine mod (by the modpack) into the mods folder.
Note: OptiFine will not show up in the list of mods inside the modpack. This is because it was manually installed. To check if it’s working you can open Minecraft’s Video Settings.
How to Use OptiFine In Minecraft To Optimize Game Performance?
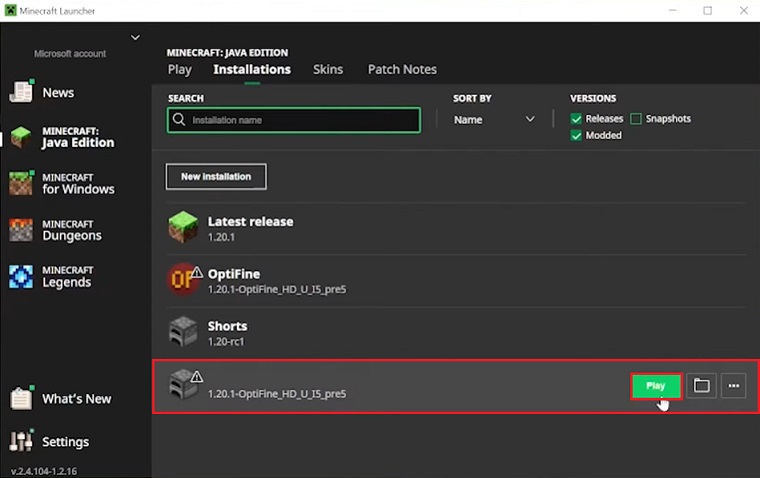
After the installation of OptiFine is complete, launch Minecraft. Make sure to select the OptiFine profile from the bottom left and then click PLAY. Take a look at the image below to see how it should be. This OptiFine profile will be created automatically in the Minecraft Launcher upon installation of OptiFine into vanilla Minecraft Java Edition.
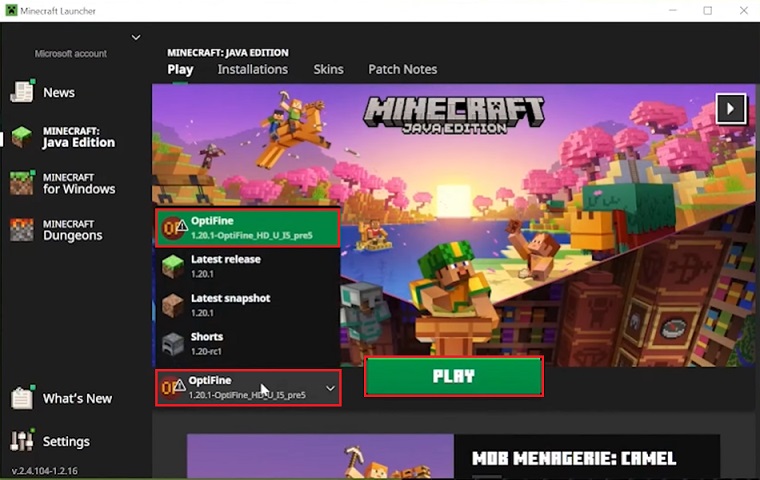
In case no new profile is present in the Minecraft Launcher we will create a custom one manually. To do so follow the steps given below.
Manually Create OptiFine Profile
Click on the Installations tab in Minecraft Launcher.
Step 1: Make sure there is a check next to “Modded” on the top right side and then click New Installation.
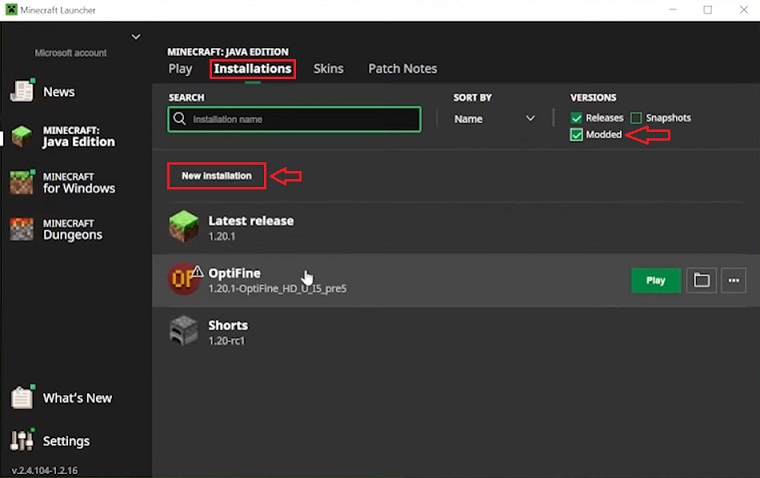
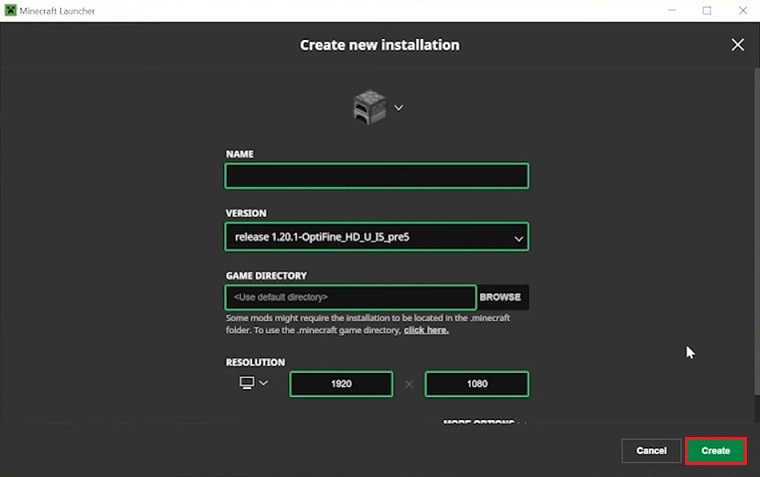
Step 2: In the new window of Create a new installation enter the details.
-> Name: Enter a custom name for the profile.
-> Version: Select the version of OptiFine you have installed in this section.
-> Game Directory: Leave this spot empty or provide it with Minecraft location installation.
-> Resolution: Select the desired resolution.
Step 3: Click on Create once done.
Step 4: Now go back to the Installations tab, look for the new custom profile and click Play next to it.
How To Use Best OptiFine Settings?
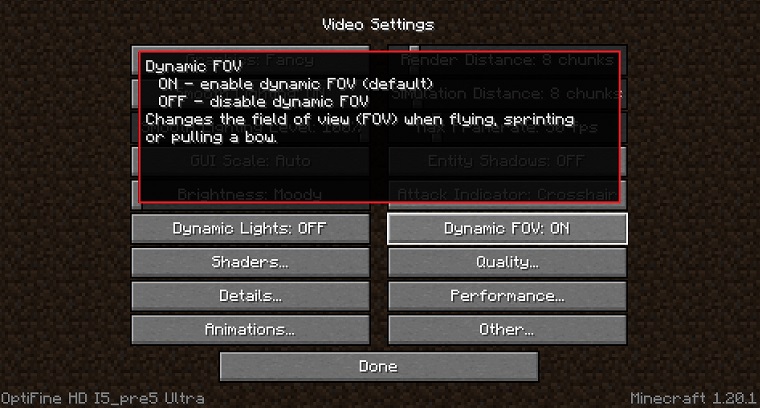
Once in-game go to Minecraft’s Video Settings and look at the bottom left/right to see if OptiFine is working. You should see the installed version of OptiFine on the bottom left. On the bottom right side, you should see the version of Minecraft. Another thing you might’ve noticed is that installing OptiFine has brought many new graphical settings. You can adjust them as you see fit to further improve the performance of Minecraft.
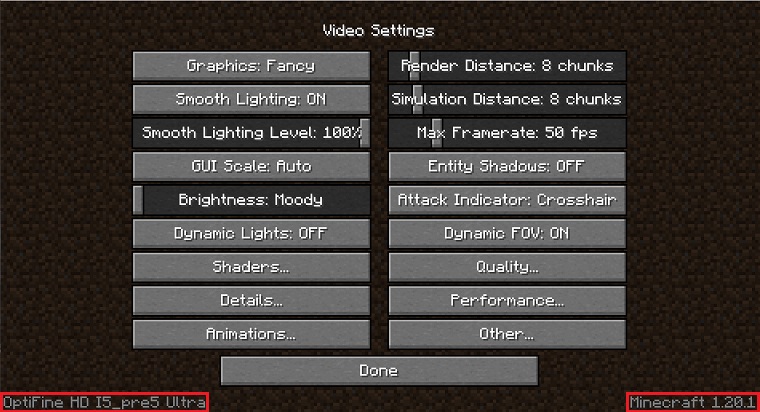
Even if you have no idea about what these new settings do, don’t worry OptiFine also introduces a new feature where you can hover over a certain setting and it explains what that specific setting does. In the image below you can see that hovering over Dynamic FOV brings a small window up that explains what it does. This makes using OptiFine easier by adjusting the graphical settings.
How to Install & Use Shaders in Minecraft
Shaders are modpacks that change the look and feel of your Minecraft world. Shader pack support is a huge part of Optifine and Optifine makes it really easy to use these shaders. You can install multiple shader packs at the same time, and later on, you can swap between these installed shader packs while playing Minecraft.
How To Install Shaders Using OptiFine in Minecraft
After the installation of OptiFine, you can now proceed to install shader packs into Minecraft. Installing shader packs with OptiFine is as simple as dropping a file into its required folder. Follow the steps below to install any shader pack into OptiFine:
Step 1: Download the desired shader pack and it will be downloaded as a *.zip file. (Don’t unpack it)
Step 2: Move the *.zip file to the following folder “Local Disk (C:) > Users > (Your PC Name) > AppData > Roaming > .minecraft > shaderpacks”.

How To Use Shaders in Minecraft Using OptiFine
Using shaders in Minecraft with Optifine is easy as there isn’t much you need to do after installation of the shader pack. You can, however, swap between the installed shader packs. To learn how to do that follow the instructions below:
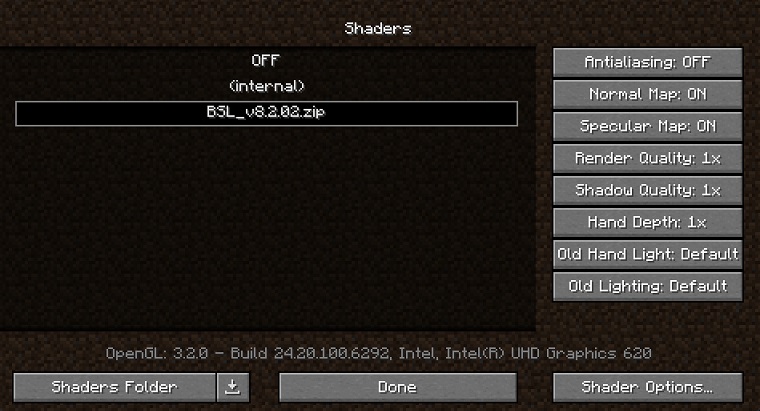
Step 1: Go to Video Settings in Minecraft and click on the Shaders button.
Step 2: Double-click on your desired shader pack to load it.
How to Use the OptiFine Zoom-In Feature in Minecraft
Vanilla Minecraft Java Edition includes a zoom-in feature that can come in handy at times. Whether you wish to survey an area from far off or just want to scan an area to avoid enemies, this feature can be very useful. OptiFine enhances this feature further increasing the zoom distance. You can press C at any time in-game to use this zoom-in feature.
FAQs (Frequently Asked Questions)
If you can’t install Optifine then check to see if you have the right version downloaded for your Minecraft. Also, make sure you have Java installed as that is one of the main issues for people who face this problem. If you have Java installed but still cannot open the Optifine jar file then it might be a case of the hijacked jar file. This problem can be resolved by using Jarfix or reinstalling Java.
Optifine is strictly a client-side-only mod. This means that the mod is only installed on the client’s computer and is not supposed to be installed on a server. If however, you do install it on a server then expect performance issues along with frequent crashes.
In case you are installing Optifine into a Forge version of Minecraft, place the file into the mods folder inside Minecraft’s installation directory located in: “Local Disk (C:) > Users > (Your PC Name) > AppData > Roaming > .minecraft > mods”.
OptiFine is a mod that cannot update itself, so it needs to be updated manually. This can either be done through your Minecraft Launcher, if it supports it otherwise the newer version will need to be downloaded and installed again.
To fix this error, go to the Installations tab in your Minecraft Launcher and create a new installation of the same version in which you’re encountering the error. Once the new installation is completed, launch it and it will install its own Java (JDK/JRE). After this is done, close Minecraft and proceed to install Optifine. You will see that the problem is now fixed.
To add Optifine to Minecraft simply download the desired version of Optifine. You will see a .jar (Java) file, run it and click on Install. That’s all, Optifine is now added to Minecraft.
To use Optifine with Curseforge, you will need to add it to a modpack. In the Curseforge launcher go to the My Modpacks tab, select the modpack you wish to add Optifine to, and click on the three dots next to the Play button. From the drop-down menu click on Open Folder. Place the supported version of Optifine (by the modpack) into the mods folder. That’s it you can now use Optifine with the Curseforge launcher, launch the game and head over to Video Settings to see if Optifine is working.
As of now, Optifine is only available for Minecraft Java Edition. So it cannot be installed in Minecraft’s Bedrock Edition.
Yes, Optifine works with Forge. Forge is the only mod loader to be officially supported by Optifine.


![Intuit QuickBooks Payroll Review [year]: Features, Prices & How it Works](png/intuit-quickbooks-payroll-review-features-prices-how-it-works-1-300x212.png)


![Best VPN Service in [year]: VPNs tested by our Experts](png/best-vpn-service-vpns-tested-by-our-experts-softlay-300x169.png)
