Zooming, or more accurately, scaling an image, video, or film increases the size of the image or clip you want to showcase. Knowing how to zoom in on Capcut helps the viewer’s eye get a better view of your screen.
If you need to get a closer look at the details on your screen or don’t want your viewers to miss the finer details of the frame then this article on how to zoom in on Capcut will help you to make compelling post-production zoom effects.
How to Zoom in on Capcut?
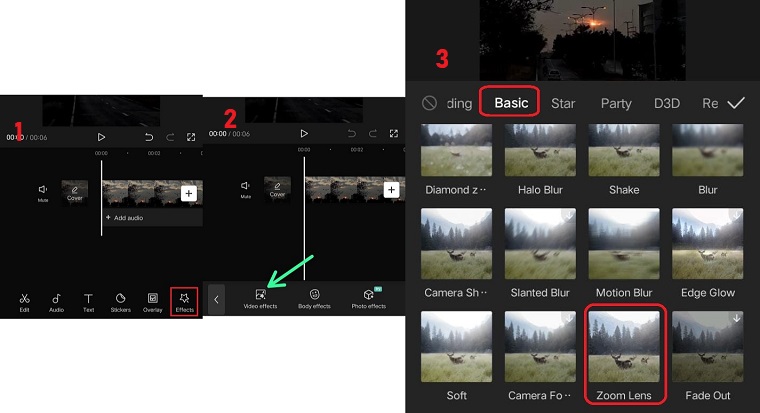
CapCut provides a comprehensive range of features for creating and editing short videos. You can easily zoom in on a video using the Zoom Lens effect, which is a preset effect that requires only one click. Here are the detailed steps for doing so.
- Launch CapCut on your device and create a new project.
- Add the video to use.
- Click the Effects button at the bottom, then select Video effects.
- Scroll through and choose the Zoom Lens effect in the Basic section.
- Customize the Speed and Range by clicking the Adjust button.
- Tap the checkmark to apply the effect.
- Hold and drag the edge of the effect to set how long the zoom effect will last.
- Save the zoomed video using the Export button in the top right corner.

How to Do Slow Zoom-In on CapCut?
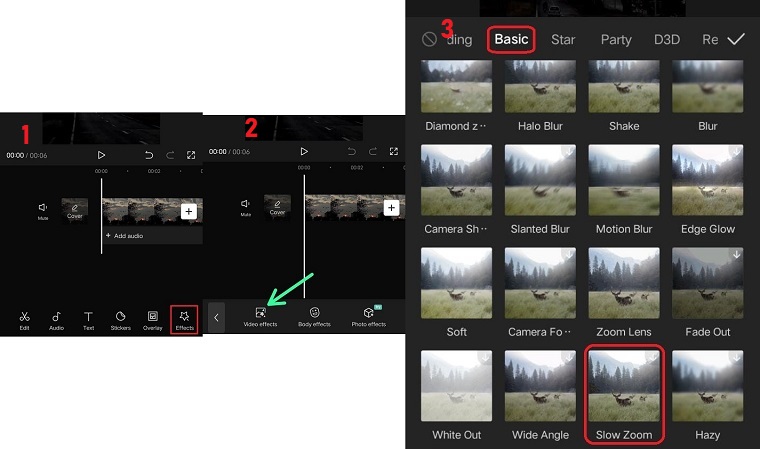
The Zoom Lens presets may not always provide the desired results, as the zoom effect may either disappear too quickly or not appear in the intended location. To overcome this, you can use the keyframe feature in CapCut to precisely control the zooming process in your video, including the duration and location of the effect. Here are the steps for creating a slow zoom effect in CapCut.
- Create a new project, and import the video.
- Click the Effects button at the bottom, then select Video effects.
- Scroll through and choose the Slow Zoom effect in the Basic section.
- Customize the Speed and Range by clicking the Adjust button.
- Tap the checkmark to apply the effect.
- Hold and drag the edge of the effect to set how long the zoom effect will last.
- Save the zoomed video using the Export button in the top right corner.

How to Use 3D zoom on Capcut?
If you spend time on TikTok, you might have come across the popular Capcut 3D trend. This trend has gained significant traction in the wake of the short-form video boom. The effect involves zooming in on the people or objects in the picture while creating a 3D-like appearance by moving the background away. While the effect is currently only available for images, you can still follow the steps below to create the CapCut 3D Zoom effect.
- Start Capcut and create a new project.
- Choose and add 8 to 11 photos to the project.
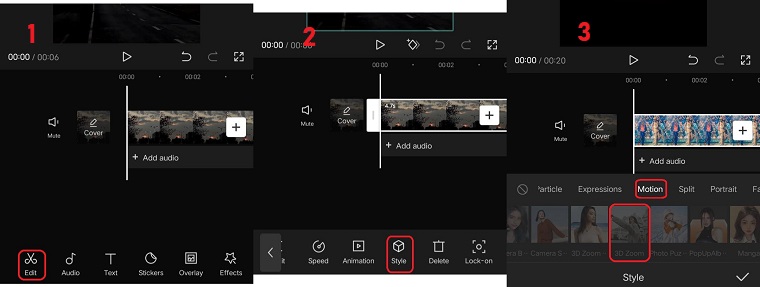
- Select the picture or click the Edit button once you move the play head to the image.
- Scroll the bottom toolbar to the left until you see the Style option.
- Click the Style option and select the 3D Zoom style. CapCut will automatically apply it to the selected picture.
- Click the checkmark in the lower right corner to save the effect.
- Reduce or extend the duration of the effect by holding and dragging the edge of the picture.
- Repeat the above steps for the rest of the pictures.
- Click the Export button to save the CapCut 3D Zoom effect.


![Intuit QuickBooks Payroll Review [year]: Features, Prices & How it Works](png/intuit-quickbooks-payroll-review-features-prices-how-it-works-1-300x212.png)


![Best VPN Service in [year]: VPNs tested by our Experts](png/best-vpn-service-vpns-tested-by-our-experts-softlay-300x169.png)
