- You should manually increase fan speed on PC if you are dealing with resource-intensive apps or playing modern games.
- Manually controlling PC fan speed is also important if you’re constantly hearing a loud fan noise.
- To manually change PC fan speed first you must know what type of CPU fan or case fan you have in your PC? Is it Molex, DC, or PWM?
PC fans play a vital role in cooling down internal hardware so to prevent them from overheating. Usually, a PC has a case fan, CPU fan, GPU fans, and one attached with PSU. All of them perform one function, which is to expel hot air and intake cool air. This process helps PC to maintain ideal CPU temperature.
In this article, we have explained various methods to control and manually increase PC fan speed. We have also explained ways if your PC doesn’t allow you to adjust the PC fan speed.
- What type of CPU Fan you Have?
- Change Fan Speed on PC via BIOS.
- Download PC fan speed Controller Software To Adjust CPU Fan Speed.
- Buy External fan controller
What Type of CPU Fan or Case Fan Your PC Have?
Before you start making tweaking with your PC fans or install third-party fan controller software, you need to make sure that the fan’s connector allows you to take control of your PC fans.
Pro-Tip – Any fan that is directly connected to your PC’s motherboard is controllable via BIOS, or fan controller software according to temperature, but those fans that are directly connected to the PC’s power supply will only run at a fixed speed.
So it’s the type of fan’s connector that will determine which method you should apply to change the PC fan speed. To check what CPU fan you have you open the side panel of your PC.
- Turn off your PC and disconnect the power cable.
- Remove the side panel to have a look.
- Now Check the PC fans connector
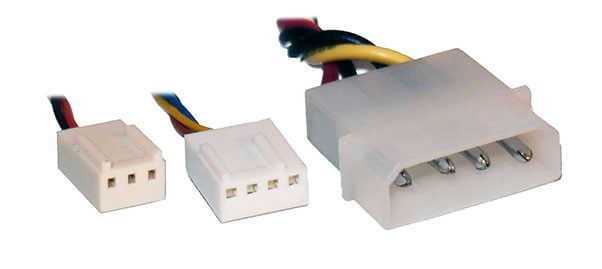
Unplug the CPU fan cable and check if it’s 4-pin Molex that is directly connected to Power Supply Unit, You won’t be able to control or increase fans’ speed. Instead, you will need to buy the Fan Controller hub.
On the other hand, if the fan connector have 3 or 4 pins that are connected to the motherboard. These are DC fans or PWM fans as they derive their voltage from the motherboard so these fans can be controlled via BIOS or PC fan speed Controller software.
Method 1 – Control PC Fan Speed Using BIOS
The easiest way to manually increase PC fan speed is through the BIOS settings. The BIOS also has a built-in feature to check CPU temperature. The BIOS version may vary but it always has one feature that is to control CPU fans speed.
To run BIOS Restart your PC and once a black screen appears having a message, like press “Delete“, “F2“, “F10” key to “Enter Setup”. Press that key.
How you locate PC fan control settings in the BIOS depends on its version.
- You may find Hardware Monitoring Tab > PC Health Status > Find CPU Fan > Set the Fan Type (DC/PWM) > Select Performance Mode > Set Temperature Threshold i.e. 70C > Save & Exit Setup.
- Or Find System Configuration Options > Look for Fan Settings > Enable Fan Always On > Save & Exit.
- Most BIOS Versions have these options i.e. Monitor > Status > Fan Speed Control > Select the Fan and Set RPM (400RPM or 500RPM) > Enter > repeat steps for al Fans > Exit > Save Changes and Reset.
Method 2 – Download Fan Controller Software To Manually Adjust, Control, or Increase fan speed on PC
If you are sure that your PC has PWM fans that are controllable via the motherboard. Or if you want to avoid the hassle of running BIOS then you should download fan controller software for Windows PC.
You can also use this fan control software in laptops to change CPU fan speed.
You can start with the most popular fan control software that is SpeedFan. It’s the best free fan speed controller software for Windows PC.
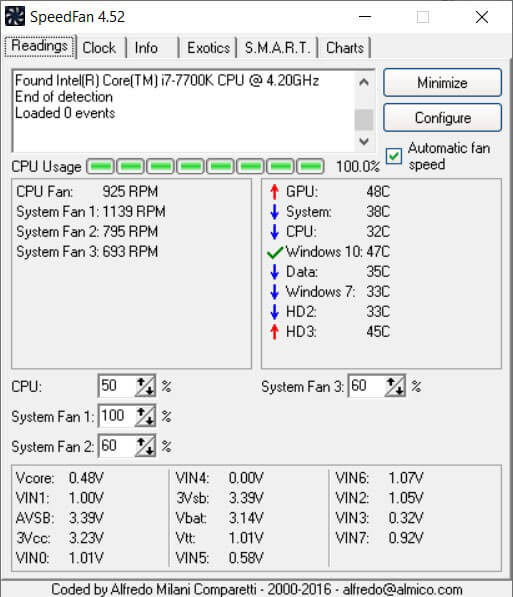
Download SpeedFan and install it on your PC. Choose the automatic fan control option or manually increase fan speed. But you can’t use these options right after installing SpeedFan on your PC. For that, you have to make some changes in SpeedFan’s advanced settings.
- On the Speedfan main screen, go in Configure > Advanced Tab
- Select Chip that is your motherboard model.
- Once you select chip you will see PWm1, PWM2, PWM3, etc., and many more readings.
- By default fan’s value will see set On/Off or some other. Change that value and set it to manually/ software controlled.
- Tik “remember it” box so that SpeedFan saves settings.
- Now Use the arrow keys next to your respective fan(s) to adjust the fan speed up and down.
If the SpeedFan is working then you should be able to check the increase in fan RPM. In certain situations where SpeedFan doesn’t detect fans or CPU temp read this article to fix the problem.
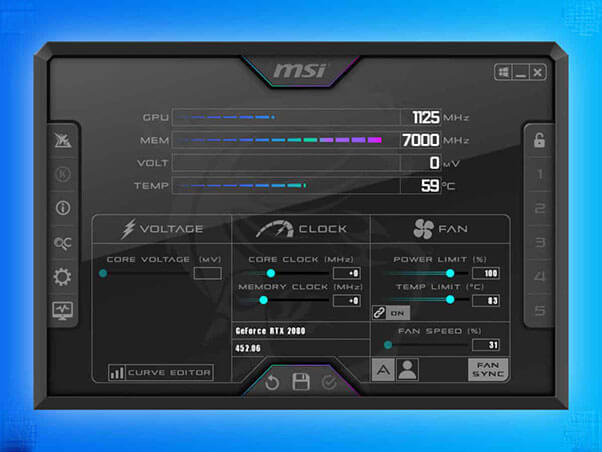
Alternativly you can also download MSI Afterburner in your PC. Apart from adjusting CPU fan speed this tool also allow you to change GPU fan speed. You can set custom fan curve, overclock PC by running various stress tests. This tool lacks ability to change or control fan speed on laptop.
The Argus monitor, Corsair Link 4, Easy Tune 5 are some other fan control software that can help you manually increase fan speed on desktop PC.
Method 3- Buy External Fan Controller Hub For Desktop PC
As already explained if your PC has 4-pins Molex CPU fan then you won’t be able to change it’s speed. Because these kinds of fans are directly connected with Power Supply and runs at a fixed speed.
On the other hand if you don’t want to use any fan control software cause you fear that it might cause damage to your PC. Then buy fan controller hub and manually increase PC fan speed.
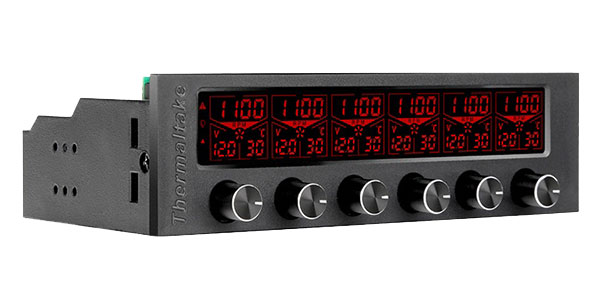
ThermalTake Commander F6 RGB Fan Control can also monitor CPU temperature and fan voltage. You can control individual fan using the knobs. The only disadvantage of using Thermaltake Commander is that it’s purely manual and don’t have auto adjust feature that automatically increase fan speed based on temperature.
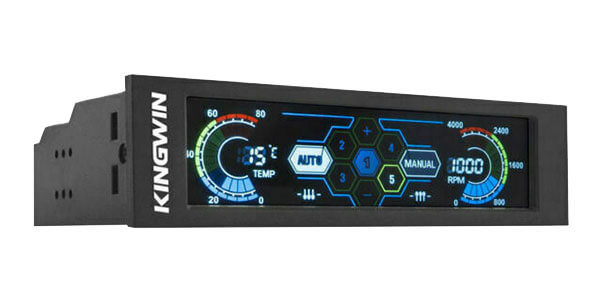
However, Kingwin FPX-007 has both manual and automatic modes, and isn’t too expensive. It has a touch screen and capacity to control 5 channels at a time.


![Intuit QuickBooks Payroll Review [year]: Features, Prices & How it Works](png/intuit-quickbooks-payroll-review-features-prices-how-it-works-1-300x212.png)


![Best VPN Service in [year]: VPNs tested by our Experts](png/best-vpn-service-vpns-tested-by-our-experts-softlay-300x169.png)
